


Basic Accessibility Solutions
Verify Document and File Accessibility


Basic Accessibility Solutions
What Are HTML Documents?
For the most part, KSU’s learning management system (LMS), D2L Brightspace, is accessible—meaning that the structure of the LMS is rendered in such a way that all the menus, nav bars, and native content are already designed for accessibility. It’s the content we add to our D2L courses, such as our documents, websites, images, and other types of files, that we need to verify is accessible.
Of course, with certain types of files and documents, such as Word documents and PDFs, you can check the accessibility before you place them in the course. You can also use Blackboard Ally to review that content after you’ve placed it in the course.
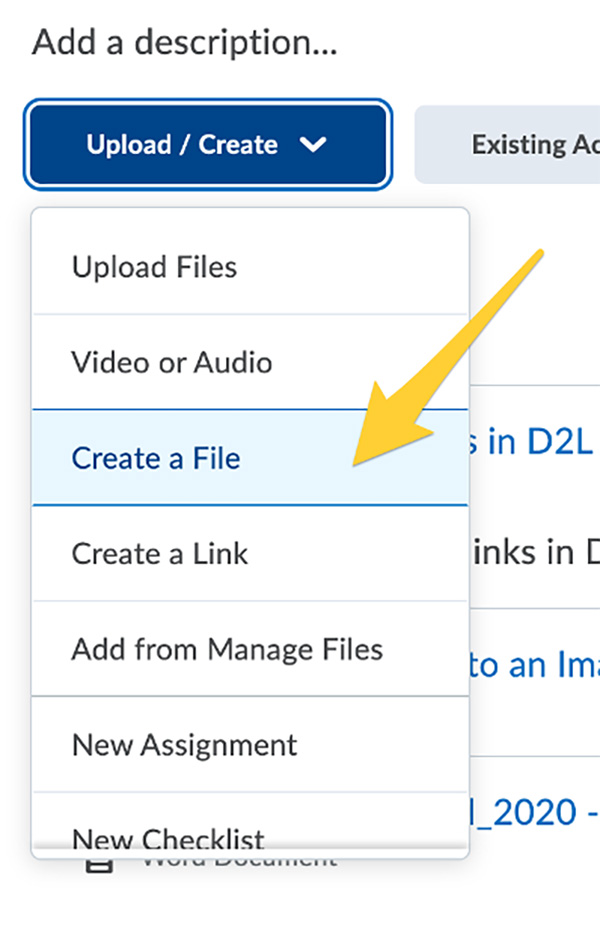
However, many instructors like to create content directly in D2L using HTML documents rather than uploading documents. HTML documents are the pages you create in D2L by clicking the "Create a File option" under "Upload / Create" when editing your course. This is a great option for creating information in your course because it’s easily read by screen readers and doesn’t require a separate interface.
Checking HTML Document Accessibility
You may be wondering whether it’s possible to check these files for accessibility the same way they are in a Word documents or PDFs. You certainly can, and it’s very easy to use.
To begin, click "Create a File" under the "Upload / Create" option or choose an HTML document you’ve already created (it will be labeled Web Page), open the down arrow, and click "Edit HTML".
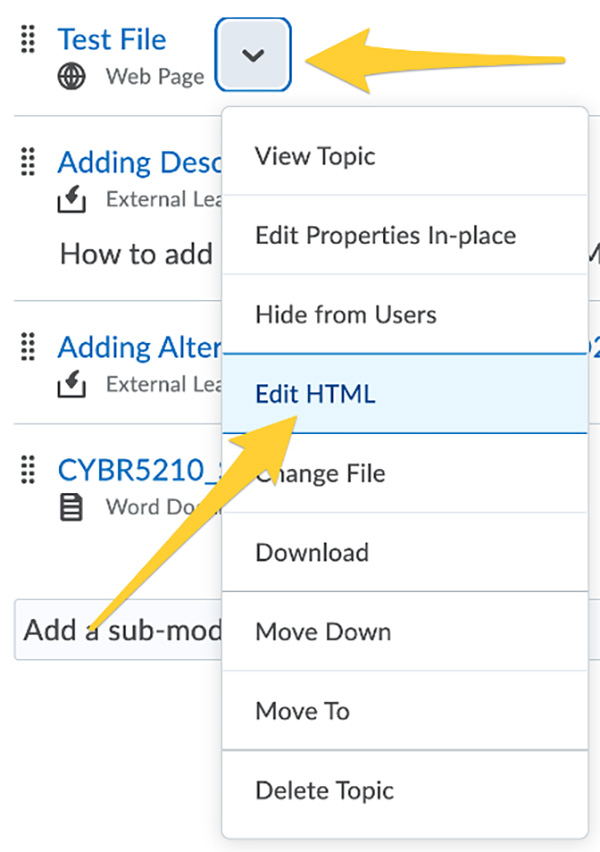
This opens the rich text editor, which allows you to add content to the HTML document. You can write text, add images, graphics, or tables, etc. As you work, make sure you click “Save.” If you do not, the accessibility checker will not check new additions to the content.
At the bottom right of the rich text editor, you’ll see several icons. One of them looks like an eye with a little check mark next to it. Click that icon to open the HTML accessibility checker.
When you run the accessibility checker, D2L will begin searching your content for accessibility issues such as low-contrast, missing alt-text, table formatting, etc. After clicking the icon, you will see one of two indicators. A green indicator means there are no accessibility issues. If the checker does find one or more issues, such as a table missing headers and alternative text, the indicator will be red and prompt you to fix the problem. To fix the issue(s), make the requested changes, click “Repair Issue,” and go to the next issue until all issues are resolved.

HTML Accessibility Checker Video
To learn even more about how to use the D2L Brightspace HTML accessibility checker, you can watch the video below.
Contact Info
Kennesaw Campus
1000 Chastain Road
Kennesaw, GA 30144
Marietta Campus
1100 South Marietta Pkwy
Marietta, GA 30060
Resources For
Follow KSU


470-KSU-INFO (470-578-4636)
© 2025 Kennesaw State University. All Rights Reserved.